Reviewsnap - Setting Up Azure Active Directory Authentication
Reviewsnap can be easily set up to work with Microsoft’s Azure Active Directory as a custom SAML application. Follow these steps:
Single Sign-On (SSO) is an advanced Reviewsnap feature, and is only available within the Pro plan. If you would like to add this feature to your organization’s account, please contact us at help@reviewsnap.com.
Add and configure Reviewsnap as an app in Azure AD
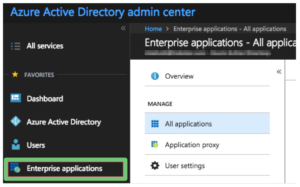
Log in to Azure AD Portal as an administrator: https://aad.portal.azure.com/
On the left side of the application, find and click “Enterprise applications”
Under “All applications”, select “New application”

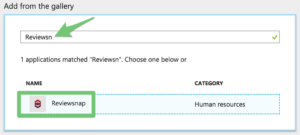
Find the section titled “Add from the gallery”. In the search box, enter “Reviewsnap” then add it to your Azure Active Directory account.
NOTE: Unless instructed by Customer Success Manager, be careful to select “Reviewsnap”, and not “Reviewsnap Classic”!
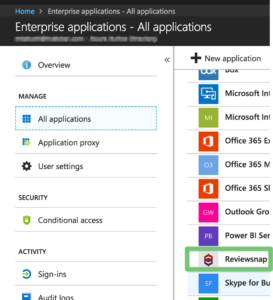
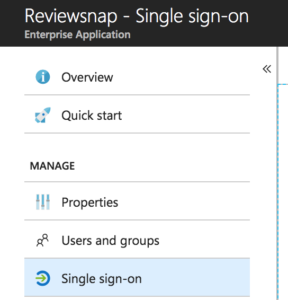
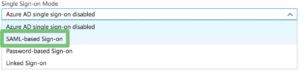
Then, find it under “Enterprise Applications” and click “Single sign-on”
Then select “SAML-based Sign-on” from the dropdown.
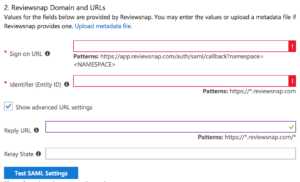
Check “Show advanced URL settings” if it’s not already.
Leave this window open. You’re going to fill it out shortly.
Configure Azure AD SSO within Reviewsnap
In another window, log in to Reviewsnap as an administrator.
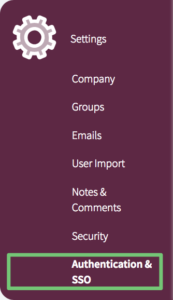
On the left side of the application, click on “Settings”, then “Authentication & SSO”.
Find “SAML 2.0” and click “Configure” next to it.
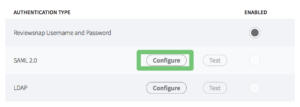
You should see the following dialog:
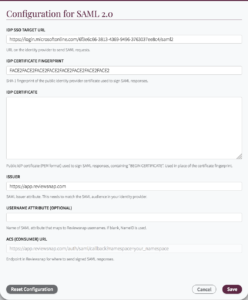
Now, you’re going to copy several key bits of information between the two systems. This will allow them to communicate.
Enter the first three items, then click “Save” in both windows. Then, you can access the final two items to complete the process.
| Azure AD | Reviewsnap | Notes | |
| SAML Signing Certificate Thumbprint | → | Certificate Fingerprint | |
| Identifier (Entity ID) | ← | Issuer | |
| Reply URL | ← | ACS (Consumer) URL | |
| SSO Service URL | → | IdP SSO Target URL | Found in Azure under “Configure Reviewsnap” |
| Sign-on URL | ← | SAML 2.0 Test URL | Found in Reviewsnap under “Test” |
Test and enable
Follow the instructions on https://www.reviewsnap.com/support-article-2/setting-saml-authentication/#testing to test and enable the integration, and for tips on troubleshooting.
Note that the NameID that Azure AD sends must match the usernames within Reviewsnap. Reviewsnap supports email addresses as usernames, but can also support other formats.
If you subscribe to Azure AD Premium, you can also create a custom SAML application for Reviewsnap within Azure AD. To do this, click “Add an application from the gallery”, then “Custom”, then select “Add an unlisted application my organization is using”.
For more information on setting up and configuring Reviewsnap with Azure Active Directory, including adding a test user, see